When my laptop crushed I found out that there are simple guides in creating bootable USB for windows 7.
Before you install Windows 7, there are few things to remember:1. Check system requirements
2. Make sure that your hardware and software is compatible
3. You need to have a USB drive of at least 4gb space in order to
create a Windows 7 bootable USB drive.
4. You need to have a Windows 7 installer DVD and an optical
drive to read the DVD. If you have only the ISO file
(downloaded directly from Microsoft) or you can use Power ISO
to mount the ISO in your computer.
Create Bootable windows 7
Download the Application PowerIso Here
Put in your Windows 7 installer DVD and plug in your USB drive.
Unzip the folder to your desktop and run the Poweriso.exe file
Open the PowerIso application then Choose the menu "Tools > Create Bootable USB Drive". Then dialog will popup. If you are using Windows Vista or Windows 7 operating system, you need confirm the UAC dialog to continue.
Then Select the correct USB drive make sure that you flash drive at least 4GB from the "Destination USB Drive".
Choose the proper writing method. "USB-HDD" is recommended.
Click "Start" button to start creating windows 7 bootable USB drive.
The copying process can take up to 15 minutes to complete, depending on the speed of your machine.
Now, you can proceed to installation:
1. Turn on the computer and keep pressing F2, F12 or Delete to enter the BIOS Set Up Screen then look for the boot sequence make sure that the first boot is set to USB Flash Drive save and exit.
2. Wait for a few seconds until the windows show up loading files.
3. Next screen show up will allow you to setup your language, time and currency format, keyboard or input method. Choose your required settings and click next to continue.
4. This time the screen gives you to option which is to install or repair Windows 7. Since you are doing a clean install you will Press "install now".
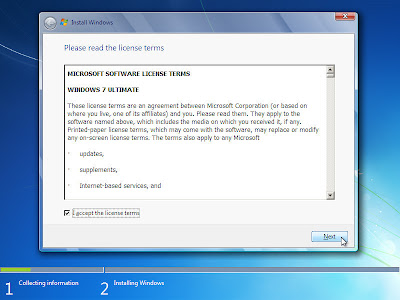
5. Read the license terms and press the Label box to accept license terms. Then press next to continue.
6. In The next screen you will have two options to Upgrade or Custom (Advanced). Choose Custom (Advanced) for a clean installation and If you are doing an upgrade then just press on the Upgrade option.
7. This is the important step as you need to select the drive would you like to install Windows 7.
Note: Selecting a wrong partition will wipe out the data. Also note that Windows 7 creates another small partition of 200 MB if you are installing Windows 7 on an empty hard drive. If you have one hard drive you will get a similar option to the image below. If you need to format or partition a drive then click Drive options (advance) before clicking next.
8. On the next screen Windows 7 starts the installation process and starts copying all the necessary files to your hard drive. Windows also may restart few times during the installation and process could take 30 minutes depending on the speed of your computer.
9. The Windows 7 Setup will restart your PC and Do not press any key during the boot prompt so that Windows 7 will continue with the installation by booting from the hard drive.
10. After the reboot your computer will be prepared for first use and Windows 7 is now loading drivers, checking to make sure everything has been setup properly.
11. After completing the installation Windows will give you to choose a user name and computer name. Then Click next to continue.
12. In the next step you will be asked to enter the Product key (License) that came with Windows 7 and Click Next. If you do not enter the product key you can still proceed to the next stage. However Windows 7 will run in trial mode for 30 days.
13. Follow the instructions on your screen to complete Windows 7 Setup Choose “recommended settings”. Then Select Time Zone, date, time and Click Next. After that you need to select the type of Network. That is, choose between Home network, Work network and Public network. As show below
14. The next screen will now finalize the settings for your computer and nearly complete like adding icons to the desktop, prepare the start menu then your computer will restart.
15. The next screen is show starting windows complete,
Now you have successfully installed Windows 7. I hope you enjoyed the tutorial on How to install Windows 7 Using Bootable USB.


No comments:
Post a Comment