Pages

Thursday, July 4, 2013

How to Clean Computer

Just like your cool gear your computer need to clean up too, Now you will learn how you can easily clean the dirt/dust inside your desktop. It will take a few minutes of your time to clean up. Remember dust can clog the airflow and causes of low performance on your computer. 

Note: You don’t necessarily have to remove the RAM, Video Card, Cd Rom, Board and Power Supply. Later on you will learn to do cleaning part by parts. Just do the basic cleaning on your desktop by now. 

Precautions:
Do not open your computer while it is running and shut down/turn off your computer. 


Unplugged all the electricity cables/peripherals attached such as Usb cables, Audio, Video cables at the back of your computer.


Now you can proceed by moving your computer to a well-ventilated area like table or garage. Then gather your tools/ materials for you to reach them during cleaning so you do not need to move around while you do cleaning. 


Tools you will need to clean your computer:
1. Set screw drivers
3. Cleaning cloth
4. Compressed Air/Air duster 
5. Small paint brush
6. Zip ties (if needed)
7. Cotton buds 
8. Thermal paste (if needed)
9. Pencil or pen (If needed)
10.Tape (if needed)
11.Flash light(if needed) 


Cleaning

1. To start the cleaning process, begin with unscrewing the back 
   of the panel of your desktop.


2. Then slide the side panel of the computer case.


3. Grab your compressed air and hold the trigger to release a 
   burst of air onto an area with a lot of dust build up.If the 
   compresses air can't remove the dust then you might use the 
   small paint brush.


4. Next,removing any dust particles that may have found inside 
   the Ram slots.Take your compressed air, hold the trigger, and 
   move it down the entire slot.Repeat this for every slot in 
   your computer case.


5. Now,move unto other equipment inside desktop such as your CPU 
   fan and power supply unit.Use your compressed air to blow 
   out any dust particles into the power supply box and the cpu 
   fan. You can also use a cotton buds to clean the fan by 
   rubbing it gently against the blades to stick the dust 
    particles.


6. Then don’t forget to zip ties the necessary electrical around 
   all your cables inside your cpu case.You can now truck them 
   away to reduce their visibility and give your computer’s guts 
   a cleaner look.


7. Finally, Wipe cpu case using the dust cloth then Plug your 
   cables back into their correct sockets and put back any 
   removed peripherals such as sticks of RAM or Video Card, back 
   into their appropriate sockets.


Your compute inside and out, should be looking as good as new 
And your cables should be neatly managed and out of the way of fans and other sensitive equipment.Don’t forget to clean your computer every 3 to 6 months to keep that performance up!

Friday, June 14, 2013

How to Install Windows 7 Using Bootable USB with PowerISO

When my laptop crushed I found out that there are simple guides in creating bootable USB for windows 7.

Before you install Windows 7, there are few things to remember:
1. Check system requirements
2. Make sure that your hardware and software is compatible
3. You need to have a USB drive of at least 4gb space in order to
   create a Windows 7 bootable USB drive.
4. You need to have a Windows 7 installer DVD and an optical 
   drive to read the DVD. If you have only the ISO file 
  (downloaded directly from Microsoft) or you can use Power ISO 
   to mount the ISO in your computer.


Create Bootable windows 7 
Download the Application PowerIso  Here 
Put in your Windows 7 installer DVD and plug in your USB drive.
Unzip the folder to your desktop and run the Poweriso.exe file

Open the PowerIso application then Choose the menu "Tools > Create Bootable USB Drive". Then dialog will popup. If you are using Windows Vista or Windows 7 operating system, you need confirm the UAC dialog to continue. 
Then Select the correct USB drive make sure that you flash drive at least 4GB from the "Destination USB Drive".
Choose the proper writing method. "USB-HDD" is recommended.
Click "Start" button to start creating windows 7 bootable USB drive.
The copying process can take up to 15 minutes to complete, depending on the speed of your machine.

Now, you can proceed to installation:
1. Turn on the computer and keep pressing F2, F12 or Delete to enter the BIOS Set Up Screen then look for the boot sequence make sure that the first boot is set to USB Flash Drive save and exit.

2. Wait for a few seconds until the windows show up loading files.

3. Next screen show up will allow you to setup your language, time and currency format, keyboard or input method. Choose your required settings and click next to continue.

4. This time the screen gives you to option which is to install or repair Windows 7. Since you are doing a clean install you will Press "install now".

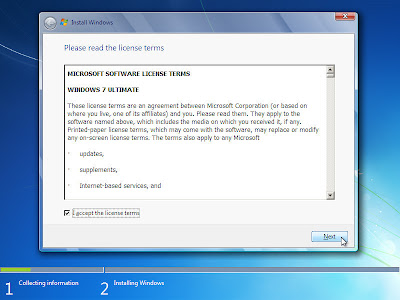
5. Read the license terms and press the Label box to accept license terms. Then press next to continue.

6. In The next screen you will have two options to Upgrade or Custom (Advanced). Choose Custom (Advanced) for a clean installation and If you are doing an upgrade then just press on the Upgrade option.

7. This is the important step as you need to select the drive would you like to install Windows 7.
 Note: Selecting a wrong partition will wipe out the data. Also note that Windows 7 creates another small partition of 200 MB if you are installing Windows 7 on an empty hard drive. If you have one hard drive you will get a similar option to the image below. If you need to format or partition a drive then click Drive options (advance) before clicking next.

8. On the next screen Windows 7 starts the installation process and starts copying all the necessary files to your hard drive. Windows also may restart few times during the installation and process could take   30 minutes depending on the speed of your computer.

9. The Windows 7 Setup will restart your PC and Do not press any key during the boot prompt so that Windows 7 will continue with the installation by booting from the hard drive. 

10. After the reboot your computer will be prepared for first use and Windows 7 is now loading drivers, checking to make sure everything has been setup properly.

11. After completing the installation Windows will give you to choose a user name and computer name. Then Click next to continue.

12. In the next step you will be asked to enter the Product key (License) that came with Windows 7 and Click Next. If you do not enter the product key you can still proceed to the next stage. However Windows 7 will run in trial mode for 30 days. 

13. Follow the instructions on your screen to complete Windows 7 Setup Choose “recommended settings”. Then Select Time Zone, date, time and Click Next. After that you need to select the type of Network. That is, choose between Home network, Work network and Public network. As show below

14. The next screen will now finalize the settings for your computer and nearly complete like adding icons to the desktop, prepare the start menu then your computer will restart.

15. The next screen is show starting windows complete,

Now you have successfully installed Windows 7. I hope you enjoyed the tutorial on How to install Windows 7 Using Bootable USB.


Wednesday, June 12, 2013

How to format USB Flash Drive

If you want to save money and doesn't want to buy a new USB Flash Drive, You can format your old to turn into new, fresh one and whether you are running Windows XP, Windows Vista or Windows 7. It is the same process of formatting you’re USB. It is very basic and can only take you same minute to format.

Step on How to Format a USB in Windows:

1.Connect or plug in your USB flash drive in your PC then


2.Click start > My computer


3.After that the next screen will show the location of your USB


4.Next is choose the USB you want to format then click format


5.The format option will pop up on your screen choose fat32 and check the quick format option and click start


6.The next message will be confirmation that you really want to erase the data on your usb


7.Click "ok" and wait for a few second until the pop message show complete


Now. you can use your new USB Flash Drive.  

Tuesday, June 11, 2013

How to format USB Flash Drive with CMD

Last time we learn formatting USB Flash Drive using windows well. This time The Command Prompt (cmd) is on the go. It is very basic to used cmd and can only take you same minute to format.


Format USB using Prompt command (CMD):
1.Connect or Plug in your USB flash drive in your PC then

2.Click Start > Type Run... and CMD Press Enter


3.The command prompt window appear.


4.On your command prompt screen type cd..


5.Until become this as show in the image below


6.Then type the word "Windows" > C:\>cd Windows


7.Follow by this "C:\Windows>cd System 32"


5.Then C:\Windows\System32>format j: and will ask you to insert a new disk then press enter


6.If you want to format it as FAT32 type:"
format J:/FS:FAT32"

7) After typing one of the above commands, press Enter

8) When it asks for pressing Enter again, just press it to confirm.

9) It will prompt you to enter a name for the drive, write it and hit Enter.


Now you have it, you can now use your USB flash Drive.

Thursday, June 6, 2013

How to Install Windows Xp From CD


Before you install Windows XP, there are few things to remember:
1. Check system requirements
2. Make sure that your hardware and software is compatible 
3. Make sure you can boot with your CD drive
4. Backup your data After Installation

Now, you can proceed to installation:
1. Turn on the computer and keep hitting f2, f12 or delete to enter the bios set up screen and make sure that the first boot device is set to CD/DVD-ROM then save and exit.


2. Insert your Windows XP CD in your CD/DVD-ROM drive. Then your PC should automatically detect the CD then the computer starts booting from the CD. The black screen message appear the following “Press any key to boot from cd” Press enter. 


3. Wait for a few seconds until the  Blue Screen show up with the Windows Setup.

4. Next step is the welcome message that will give you the option of Continuing Setup, Repair a previous installation, or Quitting. Press enter to Setting up your computer for install and you may also choose R to Repair or F3 to quit then reboot the system. Since you are doing a new install you just press Enter to continue. 


5. The next screen, which contains the Microsoft license agreement or EULA and if you agree press "F8" to continue, press "ESC" if you disagree. If you disagree setup will finish.  


6. The next screen you encounter, allows you to add or remove partitions, and decide where XP is going to install. Select the partition you wish to install to using the UP arrow and DOWN arrow keys.  F3 to Quit and reboot the system.       

7. Now you are presented with several formatting options. Choose format the partition using NTFS file system. This is the recommended file system. If the hard drive has been formatted before then you can choose Quick NTFS format.


8. This time the Windows will now start formatting drive C:


9. Then once the installer has formatted the C: partition or drive, it will begin to copy all the files which XP needs onto the hard disk.

10. This installation process can takes a few minutes once the file copy has completed, your computer will reboot.  It is not necessary to remove the installation CD at this point. Then you will be prompted ‘Press any key to Boot from CD” just Ignore the displayed. Wait for a few seconds setup will continue. Windows XP Setup wizard will guide you through the setup process of gathering information about your computer.

11. after the Collecting information and finalizing your computer. Follow the instructions on your screen to complete Windows XP Setup then you will see a screen message that says "thank you" now finished installing Windows XP and Press finish.


Now you have successfully installed Windows. I hope you enjoyed the tutorial on how to install Windows XP Professional.